De-stash to Re-stash: Simplified Stash Storage
So, you've sorted through your sewing room and found a few things you could part with via donations, de-stash sales and discarding. Now what? It's safe to say you have kept a significant portion of your stash because, let's face it, we need fabric in our lives and a lot of it. But now that you know what you must keep, you can put it away in more orderly fashion. Last week's newsletter walked through my method for effective de-stashing (if you missed it, click here). This week we'll look at simplified ways to organize all that remains. It's a long one, but full of helpful tips!
Now, I could show you numerous photos of pristine sewing spaces perfectly organized in color order (none of them would be mine) but I want to be realistic here. Every quilter has a unique craft space. From custom built cabinets and cutting stations to making do with the kitchen table, we quilt where we can and work with what we have. The ideas I'll share with you today could easily be worked into the space you have even on a tight budget. Before we dig into organizing, there are a few fundamental theories I'd like to bring to light.
1. Creativity can be messy... and that's okay!
The key is being able to find what you need when you need it, so easy-access storage solutions should be a priority. Plus, they'll make for quick cleanup when there is a clearing in the creative storm.
2. If you can't see it, you won't use it.
This idea relates to tools as well as your fabric stash and even small scraps. Look for storage options that allow the contents to remain visible.
3. Form follows function
As an interior designer, this concept has become a way of life, especially in the sewing room. Each piece that takes up space serves a function. Be it artistic materials, organizational goods, inspirational decor, it's design should serve you well. If not, it doesn't need to be part of your environment.
4. Reduce, reuse, recycle
You've already reduced the size of your stash, now look for ways to repurpose containers. Think outside the box (literally) and find creative ways to turn the existing goods and real estate in your home into functional and appealing storage space.
5. Sewing Space = HAPPY PLACE
Surround yourself with things you love, things that spark your imagination, and yes, things that keep you organized. The craft room should be the happiest work space and organization goes a long way toward maintaining that energy.
P.S. Dedicating time to de-stash/re-stash is a perfect opportunity to take your sewing machine in for servicing and your scissors for sharpening. It will eliminate some distraction and free up table space for sorting.
Now let's start organizing!

Boxes, bins, bags... You may recognize this image from last week when we discussed de-stashing kits. It's making a reappearance to show my two favorite ways to store kits. Large art bins allow you to store projects in varying stages throughout their process. These plastic tote boxes close securely, stack neatly and are great for taking on-the-go. My favorite part: you can see what's inside while keeping things uniform. They may seem like the obvious answer, but it's for good reason! Working with a tight budget? Watch for coupons and just buy one or two at a time until you have enough to house a few projects. You'll find they are worth every penny!
At the shop, we love to package the kits we sell in reusable project boxes or pouches like the vinyl zippered Corn Wagon pouch shown above. Did you know we sell these pouches individually? They're awesome for storing blocks, stitchery projects and so much more. Once again, you can see what's inside! Both of these reusable options are great for projects in-the-works and those that have been set aside for another day.
For my sewing room, my husband built me the coolest set of wall bins close to my cutting table. The top portion consists of 6 open bins for tossing scraps as I cut (more on that in a moment) and the lower portion is sized to fit the art bins. I try to keep my works in progress here and the rest of my kit stash is tucked away neatly in the closet. When I open the closet door, voila, it's easy to see which kit is where and I know they are well protected.

Where to put ALL THAT FABRIC... As mentioned last week, I like to break my fabric up into two categories; yardage and scraps. If you have space for it, yardage is best kept as flat folds on the shelf, stacked so that you can see the fold for easy searching. Some like to roll their yardage onto mini-bolts and stand them on a shelf, library style. They key is to store it in a way that you can easily see what your options are without digging and, hey, who wouldn't love a regular view of their own fabric library?
Smaller fabric cuts (less than 1 yard) can be sorted into containers by color, style, designer and/or size. I've tried many different containers and my favorite has become a soft-sided sweater storage box (shown above). They are sized to fit perfectly on a closet shelf or even under the bed (we know that fabric stash can quickly takeover the house). The cloth "box" allows fabric to breathe which is important for long term storage. Bonus: some come with a cedar stick insert to repel insects! The clear vinyl top means, you guessed it, I can see inside. Fold each piece and stand it vertically so that you can easily see the edge of each fabric through the top. With a full zipper around three sides, it opens completely so you can thumb through like a fabric file. Super functional and space saving. An alternate, more budget friendly option is to reuse the plastic zipper bags that bedding comes in for the same method. I use both interchangeably to sort my fabrics by style. As you can see above, I may have an addiction to Tilda fabrics...
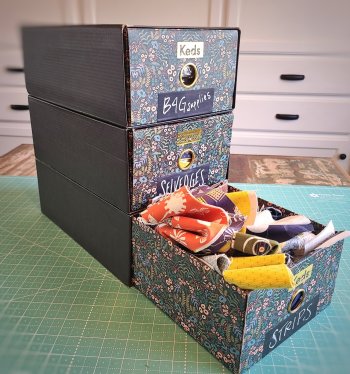
But what about those small scraps? That's where the open bins that can be placed near your cutting station come in handy. As you cut, simply sort your usable scraps into their appropriate bin! Since they're intended for small scraps, these bins don't need to be large. Use a set of baskets, plastic totes, canvas cubes, or even plain cardboard boxes wrapped in pretty paper or... fabric! Whatever fits your space and budget. Not only are open scrap bins pretty to look at, you're more likely to use those little bits if they're gazing back at you. If you really want to up your scrap game, you can sort by size. I actually have a thing for saving cute shoe boxes (like those above for example) and I use them for collecting various strip sizes. You'll be surprised at what you can and will use when you know exactly where to find it.
What NOT to do: Too often, a glorious fabric stash gets dumped into over-sized, opaque storage containers. These bins tend to be giant stash eaters. Once the fabric goes in, the lid is closed, the lights go out and all the creative beauty they hold is forgotten. When the lid is finally lifted, we find ourselves digging through what's lost inside. They get heavy, hold stagnant energy and do not allow your fabric to breathe. Try to only use these where absolutely necessary.

I'm going to make myself vulnerable here for a moment and show you how these storage solutions come together in a corner of my own stash closet. It might not be the prettiest set up -- definitely not in color order here -- but each storage solution is intentional and has proven it's worth in my personal space. Just barely seen on the top shelf, you'll find my flat fold yardage open for easy viewing. Next, note the sweater "boxes" in single layers that function as makeshift drawers, easy to pull out and see what's inside. Between rows of organized fabric, you'll spot my project boxes (stored away for another day) and smaller sorting boxes all clearly labeled on the front as to what's inside. These are kept an eye level for easy access. Having a variety of containers allows this style of organization to remain fluid as my projects and space needs change. Every inch of this space is used (and this is just a sliver of it), yet every portion of my stash remains tidy, easy to access and ready for creative play in my happy place.

But what about notions? I won't spend much time here because there are honestly sooooooo many great storage options marketed just for sewing goods. At the shop, we're always looking to offer new, convenient ways to protect and organize the tools of our trade (a few are shown above). My advice is simply this: because sewing notions are an investment in your craft, keep your favorites close at hand, yet protected. My most used tools are kept in a sturdy pouch that comes out when I sew and tucks away in my sewing table when I stop. I always know where to find them, they're ready to drop in a bag for retreats and they remain clean and protected from little fingers and others who may not know the value of sharp cutting instruments. Notions that are only used selectively are best organized with like objects (i.e. all rulers with rulers, scissors with scissors, trims with trims...). Once again, the theory applies, if you can't see it, you won't use it so organize threads and handy gadgets in a way that allows you to see what's on hand quickly. If you don't use it, let it go!

De-stash and Re-stash is not a once and done task. Some reevaluate and reshuffle annually, some seasonally... the important thing is that you make your sewing environment friendly for YOU. Your interests change and so do your needs so don't be afraid to shake things up! And when you realize you still have a little room for more fabric fun, you know we're here for ya! <wink, wink>
 Mark Your Calendar!
Friday, May 5th - Saturday, May 14, closed Sunday
We're counting down the days until our favorite event of the year! Come celebrate "Forgotten Holidays" with 13 spectacular quilt shops along the Wasatch Front.
Check out utahshophop.com where we're the featured shop this week. There you'll find full details including participating shops, prizes, rules and a map.
Upcoming Sales & Events
Magic Word Monday
This Monday's Magic Word is "RESTASH." Enter the magic word as a coupon code online 04/17/23 to receive 20% off MINKY! Local customers can repeat the Magic Word at the register on Magic Word Monday and show that you follow us on social media for the same great deal! Some exclusions may apply. Cannot be combined with other offers. We will not hold items or pre-cut yardage for this special offer.
Handwork Club
Every Tuesday, 10:00am - Noon
This delightful weekly club is for anyone who would like to work on a hand stitching project while learning new hand stitching skills. It's a great chance to finish our own projects and relax with a fun gathering of sewing friends. No fee to attend. Simply come and join us!
Wrong Price Wednesday!
Every Wednesday our pre-cut fat quarters are only $3.00! Regular Price $3.75.
Time Out at the Wagon (Open Sew)
Every Wednesday, 10:00am to 4:00pm
Put yourself in Time Out at the Wagon in our School House located directly behind the quilt shop! At times we all need time out from housework, phone calls, and everyday responsibilities. Bring your current sewing project to “Time Out at the Wagon” and do just that. Marsha is looking forward to being in Time Out and hopes lots of you will join her.
Thank you for supporting your local brick-and-mortar quilt shop!
We feel honored to be part of such a wonderful quilt-making community.
We hope you'll visit us again soon,
Jen and the Girls
at Corn Wagon Quilt Co.

We would love to hear from you!
801-491-3551
cornwagonquilts.com
Now, I could show you numerous photos of pristine sewing spaces perfectly organized in color order (none of them would be mine) but I want to be realistic here. Every quilter has a unique craft space. From custom built cabinets and cutting stations to making do with the kitchen table, we quilt where we can and work with what we have. The ideas I'll share with you today could easily be worked into the space you have even on a tight budget. Before we dig into organizing, there are a few fundamental theories I'd like to bring to light.
1. Creativity can be messy... and that's okay!
The key is being able to find what you need when you need it, so easy-access storage solutions should be a priority. Plus, they'll make for quick cleanup when there is a clearing in the creative storm.
2. If you can't see it, you won't use it.
This idea relates to tools as well as your fabric stash and even small scraps. Look for storage options that allow the contents to remain visible.
3. Form follows function
As an interior designer, this concept has become a way of life, especially in the sewing room. Each piece that takes up space serves a function. Be it artistic materials, organizational goods, inspirational decor, it's design should serve you well. If not, it doesn't need to be part of your environment.
4. Reduce, reuse, recycle
You've already reduced the size of your stash, now look for ways to repurpose containers. Think outside the box (literally) and find creative ways to turn the existing goods and real estate in your home into functional and appealing storage space.
5. Sewing Space = HAPPY PLACE
Surround yourself with things you love, things that spark your imagination, and yes, things that keep you organized. The craft room should be the happiest work space and organization goes a long way toward maintaining that energy.
P.S. Dedicating time to de-stash/re-stash is a perfect opportunity to take your sewing machine in for servicing and your scissors for sharpening. It will eliminate some distraction and free up table space for sorting.
Now let's start organizing!
Boxes, bins, bags... You may recognize this image from last week when we discussed de-stashing kits. It's making a reappearance to show my two favorite ways to store kits. Large art bins allow you to store projects in varying stages throughout their process. These plastic tote boxes close securely, stack neatly and are great for taking on-the-go. My favorite part: you can see what's inside while keeping things uniform. They may seem like the obvious answer, but it's for good reason! Working with a tight budget? Watch for coupons and just buy one or two at a time until you have enough to house a few projects. You'll find they are worth every penny!
At the shop, we love to package the kits we sell in reusable project boxes or pouches like the vinyl zippered Corn Wagon pouch shown above. Did you know we sell these pouches individually? They're awesome for storing blocks, stitchery projects and so much more. Once again, you can see what's inside! Both of these reusable options are great for projects in-the-works and those that have been set aside for another day.
For my sewing room, my husband built me the coolest set of wall bins close to my cutting table. The top portion consists of 6 open bins for tossing scraps as I cut (more on that in a moment) and the lower portion is sized to fit the art bins. I try to keep my works in progress here and the rest of my kit stash is tucked away neatly in the closet. When I open the closet door, voila, it's easy to see which kit is where and I know they are well protected.
Where to put ALL THAT FABRIC... As mentioned last week, I like to break my fabric up into two categories; yardage and scraps. If you have space for it, yardage is best kept as flat folds on the shelf, stacked so that you can see the fold for easy searching. Some like to roll their yardage onto mini-bolts and stand them on a shelf, library style. They key is to store it in a way that you can easily see what your options are without digging and, hey, who wouldn't love a regular view of their own fabric library?
Smaller fabric cuts (less than 1 yard) can be sorted into containers by color, style, designer and/or size. I've tried many different containers and my favorite has become a soft-sided sweater storage box (shown above). They are sized to fit perfectly on a closet shelf or even under the bed (we know that fabric stash can quickly takeover the house). The cloth "box" allows fabric to breathe which is important for long term storage. Bonus: some come with a cedar stick insert to repel insects! The clear vinyl top means, you guessed it, I can see inside. Fold each piece and stand it vertically so that you can easily see the edge of each fabric through the top. With a full zipper around three sides, it opens completely so you can thumb through like a fabric file. Super functional and space saving. An alternate, more budget friendly option is to reuse the plastic zipper bags that bedding comes in for the same method. I use both interchangeably to sort my fabrics by style. As you can see above, I may have an addiction to Tilda fabrics...
But what about those small scraps? That's where the open bins that can be placed near your cutting station come in handy. As you cut, simply sort your usable scraps into their appropriate bin! Since they're intended for small scraps, these bins don't need to be large. Use a set of baskets, plastic totes, canvas cubes, or even plain cardboard boxes wrapped in pretty paper or... fabric! Whatever fits your space and budget. Not only are open scrap bins pretty to look at, you're more likely to use those little bits if they're gazing back at you. If you really want to up your scrap game, you can sort by size. I actually have a thing for saving cute shoe boxes (like those above for example) and I use them for collecting various strip sizes. You'll be surprised at what you can and will use when you know exactly where to find it.
What NOT to do: Too often, a glorious fabric stash gets dumped into over-sized, opaque storage containers. These bins tend to be giant stash eaters. Once the fabric goes in, the lid is closed, the lights go out and all the creative beauty they hold is forgotten. When the lid is finally lifted, we find ourselves digging through what's lost inside. They get heavy, hold stagnant energy and do not allow your fabric to breathe. Try to only use these where absolutely necessary.
I'm going to make myself vulnerable here for a moment and show you how these storage solutions come together in a corner of my own stash closet. It might not be the prettiest set up -- definitely not in color order here -- but each storage solution is intentional and has proven it's worth in my personal space. Just barely seen on the top shelf, you'll find my flat fold yardage open for easy viewing. Next, note the sweater "boxes" in single layers that function as makeshift drawers, easy to pull out and see what's inside. Between rows of organized fabric, you'll spot my project boxes (stored away for another day) and smaller sorting boxes all clearly labeled on the front as to what's inside. These are kept an eye level for easy access. Having a variety of containers allows this style of organization to remain fluid as my projects and space needs change. Every inch of this space is used (and this is just a sliver of it), yet every portion of my stash remains tidy, easy to access and ready for creative play in my happy place.
But what about notions? I won't spend much time here because there are honestly sooooooo many great storage options marketed just for sewing goods. At the shop, we're always looking to offer new, convenient ways to protect and organize the tools of our trade (a few are shown above). My advice is simply this: because sewing notions are an investment in your craft, keep your favorites close at hand, yet protected. My most used tools are kept in a sturdy pouch that comes out when I sew and tucks away in my sewing table when I stop. I always know where to find them, they're ready to drop in a bag for retreats and they remain clean and protected from little fingers and others who may not know the value of sharp cutting instruments. Notions that are only used selectively are best organized with like objects (i.e. all rulers with rulers, scissors with scissors, trims with trims...). Once again, the theory applies, if you can't see it, you won't use it so organize threads and handy gadgets in a way that allows you to see what's on hand quickly. If you don't use it, let it go!
De-stash and Re-stash is not a once and done task. Some reevaluate and reshuffle annually, some seasonally... the important thing is that you make your sewing environment friendly for YOU. Your interests change and so do your needs so don't be afraid to shake things up! And when you realize you still have a little room for more fabric fun, you know we're here for ya! <wink, wink>
Mark Your Calendar!Friday, May 5th - Saturday, May 14, closed Sunday
We're counting down the days until our favorite event of the year! Come celebrate "Forgotten Holidays" with 13 spectacular quilt shops along the Wasatch Front.
Check out utahshophop.com where we're the featured shop this week. There you'll find full details including participating shops, prizes, rules and a map.
Upcoming Sales & Events
Magic Word Monday
This Monday's Magic Word is "RESTASH." Enter the magic word as a coupon code online 04/17/23 to receive 20% off MINKY! Local customers can repeat the Magic Word at the register on Magic Word Monday and show that you follow us on social media for the same great deal! Some exclusions may apply. Cannot be combined with other offers. We will not hold items or pre-cut yardage for this special offer.
Handwork Club
Every Tuesday, 10:00am - Noon
This delightful weekly club is for anyone who would like to work on a hand stitching project while learning new hand stitching skills. It's a great chance to finish our own projects and relax with a fun gathering of sewing friends. No fee to attend. Simply come and join us!
Wrong Price Wednesday!
Every Wednesday our pre-cut fat quarters are only $3.00! Regular Price $3.75.
Time Out at the Wagon (Open Sew)
Every Wednesday, 10:00am to 4:00pm
Put yourself in Time Out at the Wagon in our School House located directly behind the quilt shop! At times we all need time out from housework, phone calls, and everyday responsibilities. Bring your current sewing project to “Time Out at the Wagon” and do just that. Marsha is looking forward to being in Time Out and hopes lots of you will join her.
Thank you for supporting your local brick-and-mortar quilt shop!
We feel honored to be part of such a wonderful quilt-making community.
We hope you'll visit us again soon,
Jen and the Girls
at Corn Wagon Quilt Co.
We would love to hear from you!
801-491-3551
cornwagonquilts.com